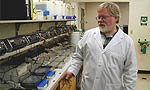
Gene Conservation Laboratory
Allozyme Electrophoresis Techniques
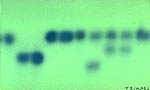 The technique of allozyme electrophoresis is one of the most common approaches used to identify discrete stocks of fish. It is a powerful tool for identifying stocks of some species, and we use this approach extensively in our work with sockeye salmon, chinook salmon, pink salmon, and chum salmon. Each of the 10 lanes represents the enzymes products from the genes of a single fish. Samples of fish tissues must be frozen immediately upon collection to preserve the enzymes for analysis in the lab.
Cooking the Starch Gels
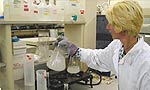 Before we actually cook the gels, we have to prepare all of the buffers and weigh out the potato starch. Allozyme loci tend to be tissue specific. So even though a loci may be found in many different tissues, it is usually best expressed in a specific tissue which is run with a specific buffer. The buffers are prepared in advance and in bulk. The tissues most commonly used for analysis are muscle, heart, liver and eye. Before the cooking process, we measure out the amount of buffer to a proportional amount of potato starch. It has been found most gels run best at a density of between 10% and 13% starch to buffer. We heat up approximately 2/3 of the buffer to near the boiling point. When the heated mixture is at the proper temperature, the potato starch is added to the remaining cold buffer and mixed with the boiling buffer solution. This is cooked over a gas stove until the mix is bubbling and viscous. The hot gel mixture is then degassed to remove all the air bubbles, as the bubbles interfere with the migration of the enzymes, making the enzyme unable to be scored.
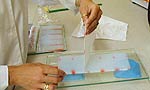
Pouring the Gel Into the Gel Frame
 Gel frames are assembled each day prior to pouring of the gel. The gel frames consist of a glass plate for the bottom and plastic sticks, which are about 1/3" thick, for the sides. The sticks are held to the glass plate with clamps. The gel frames are measured out to a specific size of either 4.5" or 5.25" wide, depending of the gel being run. All gels are 9" long, which is long enough to hold 50 samples per gel, separated with dye wicks. After the gel has been degassed, and while it is still hot and viscous, it is poured into the gel frames, making sure to completely fill the frame. A plastic pipette is used to remove any remaining bubbles. The object is to have the gel as pure as possible. After the gel has cooled to the touch, it is wrapped in cling wrap to keep it from drying out.
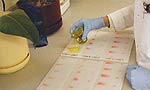
Loading the Starch Gel
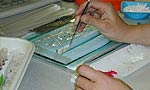 The starch gel is loaded with up to 50 individual samples. Each wick is dipped into a test tube containing supernatant from the following tissues (muscle, liver, heart or eye) from one animal. The wick is then placed at the origin (starting point or bottom) of the gel. The upper portion of the gel is called the anode and the lower, narrower portion is the cathode. Red dye markers are placed between each group of 10 individuals for a visual indicator so that the migration distance can be monitored. When the gel is loaded and ready for pre-run, the anode and cathode are pushed together creating contact with the wicks. Once the pre-run (15 minutes) is complete, the wicks are pulled and the gel is then ready for electrophoretic separation of the enzymes.
A Starch Gel "Wired" for Running

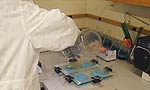
 The gels are hooked up to a power pack, which runs a current through the gel. This current pushes the enzymes through the gel, which separate out in the current to the enzyme patterns that we score. The power packs are usually set at a power setting so as not to cook the gel with too much current, but to push the enzymes along over the course of 4-6 hours. The settings can run from 150 to 450 volts and from 50 to 90 milliamps, depending on the gel density and the speed at which we want the gel to run.
Slicing and staining the gel
 Once the gel has migrated the proper distance, the gel is removed from the frame and sliced into thin slices for staining. The gel slices are plated on plastic plates, and stained. The staining process involves mixing various chemicals and reagents to bring out the desired expression of the loci. The staining process was arrived at through a process of chemistry and often of trial and error. Over time, the basic recipe is tweaked, changed and tested to come up with the best combination of chemicals. The mixed chemical is mixed with agar, which is used to solidify up the stain so it stays on the slice after it is poured. After the gel has been stained it is placed into an incubator for the final processing.
Incubating the Gel Slices
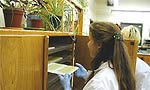 Once the stain has solidified on the gel slice, we move the stained gel to an incubator. The chemicals used in the staining process are light sensitive, so we keep them in a dark incubator until we are ready to score the gels. An incubator is used to speed the chemical reaction of the stain. Once the stain has come up enough to score, we photograph the stained gels for future reference.
Questions and Answers
Q. Why do you use potato starch?
A. Potato starch has been found over years of trial and error to be the most effective medium for allowing migration of the enzymes in a manner which allow the gels to be easily scored. The potato starch is highly refined to remove any impurities.
Q. What is a buffer and why is it used?
A. The buffers we use are composed of many chemicals. Some of the common chemicals used include: Citric Acid, Tris (Tris[hydroxymethyl]aminomethane), EDTA (Etyhylenediamine-tetraacetic acid), Glycine, and Boric Acid. There are others, but these are the main ones. We combine these in many different combinations and pH's, each of which will allow for a better expression of a particular enzyme.
Q. What is a supernatant?
A. A portion of the tissue sample is partially dissolved in a grinding buffer designed to break open the cells of the tissue and place the enzymes into suspension. The clear fluid above the tissue is called the supernatant?
Q. How do you load a gel?
A. To load a gel, we cut the gel into an anode and cathode. The cathode being the negative end, is smaller and usually only 1" to 1 1/2" wide. The anode can be from 3 1/2" to 4 1/2" wide. A wick is soaked with tissue which is partially dissolved in a grinding buffer designed to break open the cells of the tissue and put the enzymes into a suspension. The tissues are first subsampled into culture tubes (or test tubes). We buffer the tissue at this time with the grinding buffer, and refreeze the tissue at -80 C. The process of adding grinding buffer and thawing and refreezing the tissue will break apart the cells of the tissue making the enzymes easier to go into solution and into the gel. After 50 of these tissue and buffer soaked wicks are placed into the gel, the gel is hooked up to the current and prerun for 15 minutes. After this prerun, the electricity is unhooked from the gel to for wick removal and orgin cleaning. All wick and tissue debris must be removed from the origin or the gel will run poorly. After the 15 minute run, there is enough of the enzymes embedded in the gel to give a good score. Once the wicks are pulled and the origin cleaned, the gel is again hooked up to electricity and run for the prescribed amount of time (up to 6 hours).
Q. Why is the gel cut into two sections?
A. Just before we load the gel with the tissue soaked wick, we cut the gel into an anode and cathode. The anode, or positive end, of the gel is the widest part of the gel. The cathode, or negative end, is usually only 1" or 1.5" in size. Enzymes in the anode migrate towards the upper end of the gel with the positive current. The negative enzymes migrate down the anode towards the bottom of the gel. Both contain enzymes which we are interested in scoring, and often, a loci will have elements which migrate both directions from the origin, or cut we made in the gel. So when staining, we have to match the two ends up for a proper scoring of the loci.
Q. Can the enzyme paths be seen prior to staining?
A. Often we really don't know how a gel ran until we stain the slice. We know from experience that the enzyme will be expressed at a certain place on the gel after the gel has run a prescribed amount of time but if the gel was poured wrong, if the origin was dirty or somehow poorly run, the gel will have a "glitch", and we will most likely have to rerun that particular gel for that particular loci.
Q. Do the enzyme paths show up immediately after staining?
A. Some do. In fact, we often will not stain a slice for certain loci until the biologists are ready to score that loci. If we stain it too far in advance, the stain will come up so strong that it will over develop, doing what we call "blowing out". Most enzymes will come up slower, and we will stain them as soon as we have them sliced, and the person scoring will be able to score them in the order in which they develop. Some enzymes will take from 15 to 30 minutes, others may take up to an hour or more for a good expression of that particular loci.
Q. Why do the starch gels need to be sliced in order to stain?
A. We are able to pull many viable loci from a gel, up to 6 on some gels. We slice the gel for many reasons. The first and most important is that in order to retrieve more than one loci, we need more than one stain. After staining a gel, the heat of the stain and incubator will often render any other loci in that slice unreadable. Heat will often destroy enzymes, so it's a one shot deal with staining. Once a slice is stained, it rarely will be good for staining any loci, other than the original one targeted. Also, the top slice of a gel usually thickens up during the running process, making it almost impossible to read accurately any loci from that slice.
Q. What is the purpose of the incubator?
A. Once the gel slice has been stained for a particular loci, the stain will develop faster in heat. This is much like developing a picture in that the picture will come up faster in certain chemicals and low light. Too much light or chemicals, and the picture will over-develop, too little, and it will be unscoreable due to under-developing.