Alaska Fish & Wildlife News
December 2020
Tracking in Snow
Taking pictures of Tracks in Snow
Signs of wildlife abound in Alaska and tracks are one of the best indications of our wild and sometimes secretive neighbors. Snow can provide outstanding tracking. Getting a good picture of a set of tracks in snow is immensely helpful later when you want to consult a guidebook or knowledgeable source regarding the track-maker and what it was doing.
For many folks, Fish and Game wildlife education specialist Mike Taras is the go-to guy for track advice. A recent Zoom presentation on tracking in snow surpassed maximum viewership. He and his colleague Jen Curl post a popular “Track Tuesday” feature on Fish and Game’s Facebook page, conjuring hungry moose, stalking lynx and hardworking beavers from scrapes in bark, displaced leaves and broken branches. They receive questions about tracks, often with pictures, and recently created a video highlighting tracks in snow and getting good pictures for future reference.
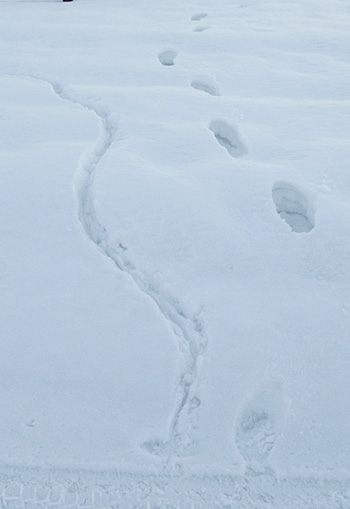
On a cold still night in early November, a pair of foxes crossed a clean expanse of fresh snow in Creamer’s Field in Fairbanks. The next day, as low sunlight raked across the fields, Taras and Curl documented the scene. The small pond, frozen and covered with shallow, dry snow, proved ideal for a lesson on photographing tracks.
Scale and lighting
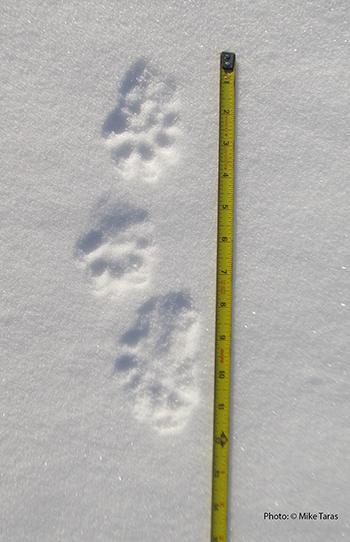
A few simple tools help, and a measuring device is key to providing scale. “The most important one is having a tape measure or some kind of measuring device, to place down at the track for some kind of scale,” Taras said. “It’s much better to use an actual ruler or tape measure, rather than coins or lighters or other things people use, because then you have to figure out how big those things are.”
Wallet or pocket-size cards with a printed ruler offer a handy option for showing the size of an individual track, but a tape will allow you to measure the stride of the animal.
The best light for track photographs is bright sun, which creates shadows that give tracks definition, making them far more distinct and visible to both the eye and a camera. As a tip, a small headlamp or flashlight can really help on days when lighting is flat or dim. Shine the light from off to one side, just above the snow to cast low level shadows. That can make or break a photography opportunity on some winter days.
Taking the picture
Get three perspectives. First, a close-up. Include the measuring device at the side of the track. Animals sometimes place their back feet directly in the print left by their front feet, registering both prints together, or you might also have a clear print of a front and hind foot. Take a picture of both front and back feet tracks if possible. Take the picture from directly above, so the angle doesn’t distort the size and shape of the track.
Jen Curl offers photography tips. If you are using a smart phone, it’s possible to take advantage of a couple features to get the best focus and exposure. You can tap an area of the image you have framed to focus. If you are looking down at your track, with the tape measure beside it, tap the screen right on the track to get the photo to focus.
To adjust the exposure, touch the screen and hold down, locking the image. An icon indicates the lock, and you can then swipe the screen to adjust the exposure, lightening or darkening to get the best quality.
Next take a picture of the gait, showing a set of front and back steps, the track pattern and the stride as the animal walked. Ideally, this picture should also be taken from directly above, as a picture from an angle distorts the pattern. Stretch your tape measure out beside the trackline so several steps are included. As Taras indicated with the fox tracks, “I have my tape measure to get the gait, placed at one track here, the left foot, and the full length to where that foot landed again. That would be about the length of the body of the animal, and the stride length.”
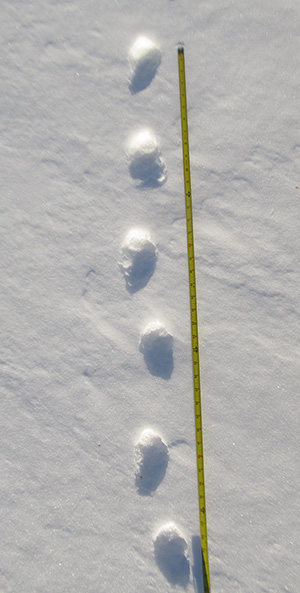
Animals also brush the snow with their feet as they walk, leaving streaks and shallow furrows. They throw crumbs of snow forward as they step. This picture will capture those signs between the prints.
Thirdly, step back for the “big picture,” showing more of the gait and a sense for the environment the animal is moving through as well. Animals walk, trot, gallop and run, they hop and bound; porcupines waddle and marten lope. The track pattern is really helpful. If the animal is loping or bounding or galloping, measuring the length of the groups of tracks and getting the distance between the groups of tracks can be an important measurement.
Taras offered another tip: If you don’t see good track, follow the tracks. Snow in Interior Alaska can be powder, but conditions change along a trackline. Often under the shelter of a tree a dusting of snow on a firm surface will provide a beautiful track. Following tracks can also reveal other clues, like scat.
Finally, take some notes for reference, especially location, time and date, and any other circumstances.
For more on tracking snow, including determining the direction of travel and aging a set of tracks, see the AFWN article, Impressions in the Snow: Winter Tracking in Alaska, by Mike Taras.
Educators can check out animal track kits and trail camera kits from ADF&G offices around the state.
Subscribe to be notified about new issues
Receive a monthly notice about new issues and articles.