Alaska Fish & Wildlife News
September 2016
Turning a Moose Hide Into Buckskin
Brain-Tanning Alaska Big-Game Animal Skins at Home
For most of human history, the skins of harvested big-game animals were not discarded by hunters. As a product of the hunt, skins were just as essential to the survival of northern hunting cultures as were an animal’s meat, fat, and organs. The hide was saved and processed into indispensable items: rawhide rope and cord, tanned skin for clothing, gloves, footwear, bags, pouches, quivers, blankets, shelter covers and much more. While it is safe to say that most bear skins are retained by hunters who harvest them today (and sometimes mountain goat and Dall sheep skins as well) it is also safe to say that the skins of most of the moose and caribou harvested by Alaska hunters are not retained but are discarded in the field.
This is all for very practical reasons. Getting the skin from a big game animal out of the field and properly processing it for safe storage adds a lot of time and work to the priority task of packing out meat, caring for its quality, processing it, and getting it put away in the pantry. As rational choices, I’ve left behind more than a few caribou skins and a few moose skins in the field, and a sheep cape once too. It is just what I had to do. I’ve packed a few very heavy, fat-laden, bear skins out of the field. The first time I did that when I got the pack on my shoulders my immediate reaction was “I don’t think this is possible, can’t do it.” But with more and more steps I got used to it and have since packed a few caribou, moose, and deer skins out of the field as well.
Hide retention is a regulation for many Alaska bear hunts and is even a legal requirement for one Alaska moose hunt, CM300, the Copper Basin Community Subsistence Harvest hunt in GMUs 11, 13, and a portion of 12. While I know there definitely are a few Alaskans around who keep their moose and caribou hides and turn them into usable products, the art of self-tanning large skins has largely been lost in Alaska today.
Over the last three years, as the department’s Division of Subsistence contact for public inquiries regarding the Community Subsistence Harvest hunts (CSH), I have received several phone calls from participating CSH hunters asking about moose hides. Some of these hunters are not sure what to do with the moose skin once they get it out of the field. My answer is that there are a few simple steps that must be accomplished to first preserve the hide and that from there; many worthwhile things can be done with the moose skin.
The simplest thing you can do, if you are able and willing to take on the expense, is drop your hide off with a taxidermist and pay them to do all the prep-work and then send it off to a tannery. This is what happens with most bear hides, but a bear hunter can save themselves a lot of money if they are least willing to complete the preparation themselves before sending the skin off to a tannery. Similarly, a moose or caribou skin can be home-prepped and then sent to a tannery, or even just kept and used as rawhide for a multitude of things. Or, if you are willing to put in the time and effort, you can tan the skin of a moose, deer, or caribou yourself and be rewarded with beautiful soft buckskin, which is a big-game trophy in itself, for both the material and experiential rewards tanning provides.
I successfully taught myself how to brain-tan deerskins a decade ago. Yes, “brain-tanning,” which means that you are using an animal’s brain to soften the skin into buckskin. For those interested in keeping their harvested skins and turning them into an amazing product, and especially for the benefit of those CM300 moose hunters who are required by regulation to retain the hides of harvested moose, I am going to explain how that process works. These instructions can apply to tanning the skin of virtually any big-game ungulate or bovid. Over the last several years I perfected them for caribou skins and this year I successfully completed the journey of brain-tanning a full size moose hide.
A moose hunt prequel
The story of this particular moose hide begins in late-November 2011. I had spent almost all my free time during that month wandering around on foot through sections of the Fairbanks Management Area (FMA) clutching a handmade Osage orange (Maclura pomifera) longbow hoping to get an opportunity to take a short range shot at a moose. It was late in the season, the air temperatures had been hovering between the teens and the single digits, and the spirits offered me a needed blessing, a dusting of fresh snow on the ground. I walked from my cabin down a trail into the forest in search of fresh moose tracks. Moose are abundant in this area and it wasn’t long before I encountered fresh tracks crossing the trail. I then cautiously and quietly began an almost day-long journey tracking and then getting into position to take a 25 yard arrow shot at this moose. It was nearly dark by the time I maneuvered my way by slowly crouching and crawling undetected through frozen muskeg to within this comfortable longbow range. I thought it might never happen, but just at my last moment of acceptable shooting light, the browsing moose, which had been moving in and out of the open spaces between the brush, finally stopped in a clearing and turned broadside.
I had been diligently shooting practice arrows almost every day for two months prior, in preparation for this moment. Draw, aim, release—smack. The sound of the arrow’s impact and shot placement looked good, but the moose did not hang out and simply offer itself to me. Rather, it blasted into the adjacent spruce forest and the flashing sight of its brown skin gave way to the sounds of crashing tree branches and sticks, then silence. I knew from previous archery experience not to give chase, but instead, after putting an arrow in an animal, to wait for a while before resuming my tracking. I called some friends to help and an hour later, in the cold darkness, we returned to the site-last-seen and picked up the trail. Ten yards into the forest and there was a massive blood pile, then the blood-covered fletched-end of my arrow missing its broadhead end, which had mysteriously snapped off, was found tangled in the branches of a dwarf birch shrub. Fifteen more yards of splattered blood patches and there it lay; moose down.
In the cold Fairbanks night we proceeded to do our diligent butchering. I couldn’t believe my eyes when I got to the heart and found a perfect broadhead arrow point cut going right through it. “That’s some good shootin’, boy,” said one of my friend’s in congratulations (later I would find that, after traveling through the heart, the broadhead stuck into the moose’s opposing upper front leg bone and was snapped off from the force of the moose’s final run). My buddies and I proceeded to spend most of the night packing out all the meat. The next day I walked back in to the kill site and packed out the moose’s hide, which was just about as heavy as one of the hindquarters.
Forgive me for getting sidetracked. This is supposed to be an article about how to brain-tan a moose skin, not a hunting story. But good hunting stories have always motivated and inspired me to get out on the land and to do a good job at taking care of my harvests, so I hope this story will get some people fired up for good hunting and salvage practices during this coming moose season!
Skinning and saving brains
If you want to tan your own hide, the first thing to think about is doing a careful, non-rushed, job skinning your kill. The more holes in the skin, the more work you will have in the end. But most often there will inevitably be some holes so do not despair as these can all be sewn up later.
The second most important thing in the field is to make sure you do not forget to retain the animal’s brains. I won’t go too deep into the science on this here, but the gist is that the lipid breakdown of animal brains provides wild nature’s perfect solution for penetrating and expanding the micro-fibers of skin and holding them open enough for the hide to remain soft and flexible without turning hard again (more on this later). I am not sure exactly how, but somehow hunter-gatherers the world over figured this out eons ago. The long told saying is that “every animal has enough brains to tan its own skin.” This fundamental knowledge is a core-attribute of our human legacy; without it we would probably have never been able to survive long-term in northern environments.
Skulls from Paleolithic archaeological sites have been found with the skull plates broken open, and it is surmised that this was done for the extraction of the brains for tanning purposes. You can go about this in two different ways. The easiest way to extract the brains is to remove the skull plate with a saw and scoop the brains out from the top. I always put them in a separate bag and not in a meat bag, of course. Usually I keep a few extra small Ziplocs in my hunting pack just in case I need them. While there are also accounts of Native Americans purposely fermenting the brains they saved for tanning, you do not need to do this. If I am going to be in the field for a while with meat hanging I find a flat rock to spread the brains out on and let them dry out a little bit, with airflow they will develop a casing just like will hanging meat. Native Americans also used to preserve brains in this way, like little dried hamburger patties (of course you will want to be mindful of birds and other critters if you do this). If you’ve got yourself a real trophy set of antlers and are planning to do a European mount you obviously do not want to saw off the skull plate. In this case you can extract the brains from the underside of the skull by creating an enlarged opening with a light saw at the extended end of the foramen magnum.
While brains are easy to pack out large hides are usually not. Last year I packed a friend’s full bison hide a little less than two miles. Earlier that day I had carried a bison hindquarter the same distance which seemed to have been lighter than the hide! The same can be said for brown bear hides and moose hides. Unless you can pull an ATV, boat, or plane right up to your moose kill, you will need to carry the hide at least some distance if you plan to salvage it. So it is good to pre-establish the mindset that you will have this extra load to deal with. You also need to be comfortable with the fact that once you have the hide out of the field your work will really just begin (after you have taken proper care of your meat of course).
The thing that makes tanning big skins the most doable is that working rapidly, straight to completion is unnecessary, and instead it can be done in stages, making it relaxing and without pressure. When you return from the field with your skin you can either flesh it right away (clean the ‘skin side’ of ALL remaining flesh and fat), or if you have the freezer space you can throw it in the freezer until you have time to do the fleshing. You’ll need to do one or the other in a timely manner; otherwise your skin will go bad. Depending on how you work and prior experience, it will take about 3-4 hours (or perhaps more) to properly flesh a moose skin. After processing an entire moose, most people do not want to jump straight into fleshing the hide. The easier thing is to freeze it and then set it aside for a day when you can focus solely on fleshing.
Fleshing the hide
If you froze your skin you will want to thaw it out again before fleshing. You are going to remove the remaining meat and fat with a fleshing tool. You can buy a hide flesher online and also even at some sporting goods stores in the trapping section. These work basically like drawknives, but you are pushing down and away, rather than pulling towards you. I have often de-fleshed with a very traditional bone tool, made from the rear cannon bone (a leg bone) of whatever animal I am working with. These types of scrapers have been found in 12,000 year old Clovis sites and thus have been in use for at least thousands of years. They are very common Alaska Native artifacts and are even still used by Gwich’in people in Beaver and Arctic Village, made from moose or caribou bones. Using this type of ancient tool for removing both the flesh and hair on a skin can be almost as efficient as using the metal tool and is very rewarding.
Fleshing is best done on a beam. Today people often make fleshing beams with a rounded off 12x2 inch board with the upper end raised up to waist high by a support. With these types of beams one usually uses a metal fleshing tool and pushes off the meat and fat in a downward motion starting from waist high. Traditionally native people removed the bark from a smooth log with minimal knots to make a fleshing beam. A good birch log about 6 feet long and 15-20 inches in diameter works well for this. This can be propped up on a tree stump. Use an axe to chop out a divot in the stump that stabilizes the log. You also will want to chop a clean round edge on the top of the log so as not to damage the skin while working it. The edge of the log that is propped should be beveled flat with an axe. There is also a Native American tool made from a split tibia which can be used just as a metal fleshing tool to push away meat and fat.
If you choose to use a bone tool then I recommend the cannon bone tool. Rather than pushing away meat and fat, this tool scrapes it off clean with a chopping motion. To use this method your fleshing beam is propped up head high, against a tree or a wall, and you stand facing it and chop down. Here the weight of the log holds the edge of the hide in place against the tree (or wall). For both of these methods, you will need to constantly move the skin around and focus on working the small section on top of the rounded surface, scraping approximately 10 inch x 10 inch sections at a time. Scrape until clean and repeat and so on until the hide is entirely fleshed. It will take some time, and it will feel like work. Some sections might leave you confused as to whether there are still pieces of stubborn fat remaining or not. If it is stringy and/or blood colored material that does not easily come off it is usually membrane. Just leave those sections for now.
Once fleshing is done you have passed an important threshold. For one, the hide will be a lot lighter and easier to store. Theoretically you could just let it dry at this point and it will no longer rot, but it would need to be laid out nice and flat or hung up on a beam and not be exposed to rain or moisture. Oftentimes people salt their hides at this stage. Adding a layer of salt to the skin absorbs any remaining oil and moisture and preserves the skin. If you are sending your skin off to a tannery, once fleshed, you just need to salt it and let it dry thoroughly, fold it up, and send it off (this gets more complicated with capes and animals with claws). If you just wanted rudimentary rawhide with hair on it you could also stop here, but even if you wanted a rawhide skin with hair intact for a wall-hanging you’re better off stretching it first and allowing it dry that way, then it will be nice and flat when dry (I’ll explain stretching in a moment). But if you want to make buckskin the next thing you are going to do is to remove the hair from the ‘hair-side’ of the skin (I’ll talk a little bit about brain-tanning with the hair below as well).
Hair removal
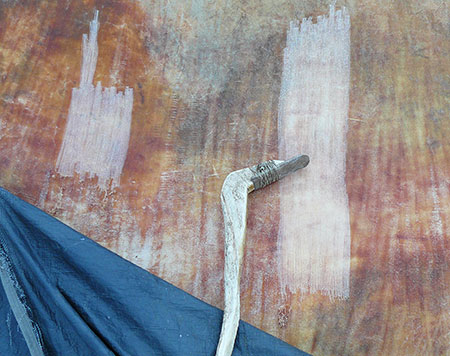
Hair-removal also takes time and feels like work. Due to time constraints, I normally do not both flesh and de-hair a hide in the same day. To make hair-removal easiest you are going to soak the hide for a day or so. The idea is to get the hair follicles to begin slightly rotting so that they will loosen, but if you soak it too long you can risk rotting the hide itself. A thick moose skin can soak for a few days or more, but a deer should not be soaked for much more than a day or two. Small skins can be soaked in a bucket; big skins will be soaked in a larger container, such as a 30 gallon trash can. The old way was simply to place the skin in a river or lake weighted down by rocks. If you salted and dried your hide you will need to re-hydrate it. Just fill your trash can with water and start stuffing the skin in, it will automatically rehydrate. Rather than dry my skins after I flesh them, I often fold them up and put them back in the freezer while still wet. Then when I want to remove the hair I just thaw it out and throw it in the water already wet. Once the hide soaks long enough to loosen the hair, hair-removal is done the exact same way as described above for fleshing. You can either use the cannon bone tool and chop down or the metal fleshing tool and push away. The hair will come off in giant strips (Figure 8). You will often see a black colored layer coming off with the hair in big clumps. This is the epidermis and must be thoroughly removed for brain-tanning. The epidermis can often be stubborn. Some sections will stay black in color even though the hair is gone. The cannon bone tool works well for going back over these sections. It will chop them away, sometimes in long black strips. Although convenient if it happens, do not worry too much about getting all of the epidermis off right away. The first priority is to remove all of the hair, exactly as described above for flesh and fat removal.
What I have been describing thus far is the ‘wet-scrape’ method of hide tanning. There is also a ‘dry-scrape’ method where the final work on both the skin side and hair side is done when the hide is dry and stretched out on a rack. For large hides, I usually use a combination of wet and dry scraping. I do all of my basic prep-work while the hide is wet and I do my fine tuning prep-work while the hide is stretched and dried on a rack. If only wet-scraping a small hide, once you get all the epidermis off you can either dry the hide for storage and pick up the work again later or you can go straight to tanning (this will be described below). If, after removing the hair from a wet skin, you do not have time to rack the skin, you can either throw it back in the freezer or let it dry, but to stretch it out on a rack you will need to rehydrate the skin again.
Before talking about racking your skin, I want to pause and make clear that all of this can be done in stages, and each major task can be spread out over time as it becomes convenient for you. For example, I put my moose skin in a freezer un-fleshed two days after I killed the moose. A few months later I pulled it out and fleshed it and then put it back in the freezer and the next summer I de-haired it. Then, a few weeks after that, I rehydrated it and racked it.
Racking the skin and lacing the hide
To rack your skin you are going to need to make a frame, the frame is rectangular in shape and needs to be big enough so that the hide will stretch to full capacity; 10 feet x8 feet is a good size for a moose skin, but you will need to measure it out because each hide is different and you do not want the frame to be too big either. Frames are most often made from 2x4s, held together by nails or wood screws. Traditionally, frames were made from raw wood, tree trunks, or large limbs measured to fit and lashed together with bark or strips of rawhide. Either of these types of frames should have stabilizing diagonal cross-beams on each corner. If you do not use these, your frame will twist when you stretch the cord. I have made frames with both raw spruce poles and birch tree trunks lashed with heavy cord and they worked just as well, but milled lumber is often more convenient to work with. Once your frame is built and your hide is ready you will also need a bunch of high-quality cord.
Next you are going to put holes in the hide, through which to string the cord all the way around the circumference of the skin. For most areas, a hole every 8-10 inches works fine, but around corners on the legs or looser spots you might need to make a hole every 4 inches. The hole only needs to be an inch or a bit less from the edge and can be made with an awl or a knife. If you are using a knife, put a piece of 2x4 on the other side to stop the knife from slipping and making too big of a hole. When you stretch the hide some of the thinner holes might break. Its ok, it happens, but try to minimize it. If you have laced the hide a long ways and a hole in the middle of the lacing breaks then you have to go all the way back to that hole, make a new one, and start lacing again.
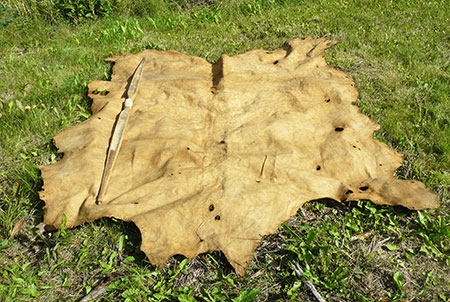
Once you have all your holes cut it is time to lace the skin onto the frame. Lacing a hide to a frame takes some time. I always lace the head and tail ends first and then lace the sides last. At first, lace the hide semi-taut but not too tight. Once all the laces are in you can judge where to tighten and where to loosen your knots so as to get the hide centered in the frame as best as possible. It is a bit tedious to get this perfect, so do not worry about it too much, just do your best. Once you have it set up as you see fit then tighten all the cords and stretch the hide as tight as it will go. A big-game hide stretched on a rack is a beautiful thing. Take a rest and admire your work. It will take a day or two to dry.
Dry scraping
A dried hide on rack can be stored indefinitely, as long as you have a place where it will stay dry. I have kept mine propped up against trees covered by tarps and a garage will work as well. To work a dried hide stretched on a frame you are going to need a new tool – a dry-scraper. These look like an adze and are often made from the end of a rounded, beveled, sharpened file attached to a wooden handle. Dry-scraping fine-tunes preparation of both the skin and hair side of a hide. On the skin side, dry-scraping allows one to remove stubborn sections of membrane. On the hair side, dry-scraping easily removes all remaining epidermis. Dry-scraping also facilitates proper scraping and cleaning of the edges on both sides of the hide. It does a great job of further opening up the skin fibers to absorb tanning solutions, and on thicker hides such as moose, a sharp dry-scraper allows one to evenly thin down thicker sections of skin, particularly the neck and backbone sections.
Many Native American dry-scrapers were made from knapped stone lashed with rawhide or spruce root to antler, bone, or wood, have been collected and can be found in museums today. I have made a few different dry scrapers from metal scraps but most often have used one that can purchased online[i]. Last year a friend and I successfully manufactured a traditional dry-scraper from a knapped blade of flint lashed to the split long edge of a moose antler paddle. We have found that both flint and obsidian blades have the potential to outperform metal blades for dry-scraping hides, as metal blades easily dull and constantly need to be sharpened. Stone blades last longer without being sharpened and do a great job of removing membrane and epidermis from a stretched dry skin. Last year, I was able to finish preparing the skin side of a stretched bison hide entirely with a stone/antler dry-scraper.
I am not recommending that you also should prepare your skin with primitive tools; I am just sharing this for the purposes of inspiration. It really is a beautiful feeling to scrape clean a skin using stone in the same way our ancestors did for hundreds of thousands of years. Regardless of what type of tool you use, the dry-scraping process is the same–you will use one hand to push the blade into the hide applying pressure as you push down on the scraper while stabilizing and pulling down with the handle. Like anything, you will easily get the hang of it, finding the perfect edge, after a little bit of trial and error.
When you have a dried skin stretched on a rack, you can spend an entire day completing the scraping on one side, or you can spend 20 minutes or an hour once or twice a month getting it done little-by-little. It is really up to you. It becomes something like a giant painting on an easel that one works on from time-to-time when they are feeling inspired or when just wanting some time for quiet, meditative, self-reflection. You will scrape and scrape and each day you will see the progress. However, you do not want to scrape too much as you might thin the hide too much! You need to eye this out carefully on the thin spots of the skin. Often times you will know you are done with a section when the surface becomes rough and looks a bit like suede in texture. Sometimes no matter how much you scrape a section you will not get that suede-like appearance and a glossy hard texture will endure. Stop scraping here. The skin might be stiffer in these sections but it will still absorb the brain solution. Lastly, once you are satisfied with the scraping on both sides (or just the skin side if you are attempting to tan with the hair on) you might want to run over the entire surface of the hide with rough grit sandpaper, just to open up the fibers a bit more.
Once you are satisfied with all your prep-work the skin is ready to tan. As I mentioned above, one could do all this prep-work and then send the skin off to a commercial tannery at this stage, which will save you more hard work. By doing at least the pre-work yourself you will save the money you would have needed to pay a taxidermist to prepare your skin for the tannery. But here we are going to talk about brain-tanning your moose skin at home.
Pre-Smoking
If you’re working with a large skin such as moose it’s a good idea to smoke your hide before tanning it. Pre-smoking my moose skin likely helped a lot with my tanning success. Wood smoke penetrates the skin fibers and opens them up to facilitate maximum absorption of the tanning solution you are going to apply. To smoke the skin you can place it in a fish smokehouse and smoke it just as you would your salmon, or you can make a teepee out of the skin by placing it on a wooden tri-pod frame and lighting a smudge fire underneath it. Smoke-wood can be obtained from green-wood, rotten wood, or wood chips. Thoroughly smoke the entire surface of the skin on both sides. Be very careful not to accidently light your skin on fire.
Tanning
To brain-tan a moose skin I recommend you set aside two days for dedicated work. Just as importantly, you will also want to have some help. Two dedicated and energetic people can do the job, but a family or group of friends turns the process into an enjoyable and meaningful community event. Of the two days you will need, only the second day requires full-time extended work. The first days work is intermittent and one can simultaneously relax or work on other household chores while accomplishing the necessary tasks.
First, you want to remove your skin from the frame. De-lace it and set aside the frame and the cord, which you will be using again later. Pull out the brains you are going to use from the freezer and let them thaw. Although, as mentioned above, one brain from each animal should suffice for tanning, for bigger skins I usually try to use more if I have them, just as an insurance measure. For example, for the moose skin I brain-tanned, I added an extra caribou brain to the solution (even when I do not keep the hide from a harvested animal I usually always keep the brains particularly for this purpose). Next you will need to mash up the brains. Some people use a blender for this, I usually just use my fingers to smash the brains and knead them (it is up to you if you wish to use gloves for this and all that follows). When ready they should look like a grey/red colored strawberry milkshake. Every particle does not need to get mashed up, but you should do as thorough a job as possible. The mashing is best done in the pot you will be cooking your brains in. Add water to the pot. Around 1 liter of water will work (for tanning with the fur on, you will be making more of a brain-paste, rather than a liquid and will thus be using less water). Bring the brains and water to a light boil, stir, and let cool. Pour the brain liquid into a 30 gallon trashcan and add a little bit more cool water, just enough so that your hide will be submerged in the solution (the more water the less potent the solution will be). Stuff your dried hide into the trashcan. Once it contacts water it will immediately be pliable and begin absorbing the liquid. Mash the hide down and be sure it is fully immersed. If not add a little bit more water. Use large rocks to hold it down so none of it floats up and becomes exposed. All of this can be done in an hour’s time as an evening chore and, for moose, should be done about two days before the dedicated tanning work days you have planned. Leave the hide soaking in the brains for about 48 hours.
Now you are committed to completing the task. The next two stages need to occur one after the other right after the hide soaks, otherwise you will risk the hide drying into rawhide again and then need to attempt braining it all over. Commit to the work and do it right the first time, and you will be very happy with the result.
Wringing the skin
Your first work day is for wringing the skin. Wringing stretches the skin, drains it of the liquid, and opens up the fibers to absorb more and more brain solution with each wringing session. For wringing you will want four to six pieces of 12 inch long cord, a smooth, straight stick about 3 feet long and 2 inches in diameter, and some type of cross beam, like a meat-hanging pole or rafter, about 7 ft. off the ground (if you are working with moose). Place your “brain bucket” (trash can) under the cross beam and pull the hide out finding either the neck or tail end. Using the existing holes in this end tie the hide up to the cross beam so that it is hanging flush to the beam. Lift it out and let the mass of excess brain solution drip back into the trashcan. Grab your wringing stick and roll and wrap the hanging end of the skin over and on-top of itself and around the stick. You will need to play around with this to get it right, but when properly placed, the wrap will hold itself as tension increases by twisting the stick for wringing. Once the stick is in place you will continually twist the stick around in a circular motion getting the twist tighter and tighter. For moose its best to have two people working each end of the stick. As the twist tightens the liquid will pour out. Keep your trash can in the place so it will catch all this liquid because you will need it for repeated wringing. Keep twisting until the wrap is as tight as possible. One person can then pull down on the stick with all their body weight to provide a really strong stretch to the skin. Once you have most of the water out of the top end the bottom end will still be a little bit wet as all of the liquid has run from the top down. To properly wring out this section of the skin you need to untie the skin from the pole and re-tie it from the other end and wring it that way as well. Once this is done place the skin back in the brain solution and let it soak for about an hour, and then come back and repeat the wringing. I soaked and wrung my moose hide 5 times (a smaller skin can be wrung less). Each wringing session only took about 15 minutes, and while the hide soaked between each session I was able to both relax some and work on other chores. After the 5th wringing I just left the skin in the brains for another night. After all this wringing and the final overnight soak, all of the skin fibers became very well saturated with the brain lipids necessary for adequate tanning.
The following morning will be your most critical day. It has all come down to this. A massive but final burst of diligent and committed physical effort, which, if not faltered, will turn you big-game skin into a real authentically brain-tanned hunting trophy. For a large skin this work session will be an all-day affair. It took me and my very reliable and hard-working partner about 12 hours to complete the tanning of my moose hide.
Stretching and completing the tanning

This is the most critical thing to remember on the day you tan your skin: it will need to be thoroughly stretched, every single square inch of it, AS it dries. If you allow any part to dry without the fibers being fully worked and stretched it WILL dry back into hard rawhide, regardless of brain absorption. The motto is: Stretch the Skin Dry. It is a tedious and time consuming task, but so are many things in life which ultimately end up being worthwhile for those who put in the effort.
On that final day of hard work, we got up early in the morning had coffee and food and then got to it. First we pulled the skin from the liquid and did another wringing, but this time very light, just to get the excess water out but not so much as to allow any areas the chance to dry too quickly.
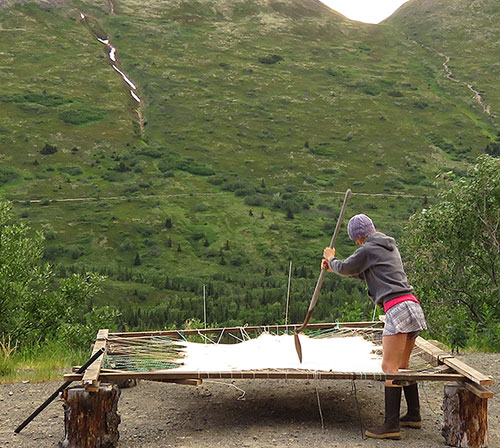
Small skins such as deer are best hand stretched and also can be worked over a beam, a tight rope, or cable lariat. But a large skin is best stretched on a frame. Thus after our light wringing we set about re-lacing the skin back onto the frame. Once we had the wet skin all laced up again we pulled it as tight as possible on all sides. Then, in order to facilitate our stretching process, we propped the frame up on all four corners with cut spruce log rounds, each approximately 2 feet tall. We moved hastily to get all of this done in order to make sure we were stretching the skin as much as possible while it dried. But you certainly have some time to do a good job re-framing the skin. There is leeway of an hour or even perhaps two for this part of the process.
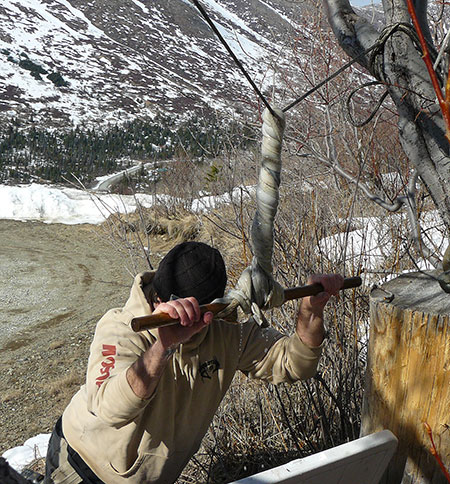
Once the skin is stretched on the frame it needs to be worked in every direction and in any way possible. Some Alaskan readers are probably familiar with the famous “Eskimo Blanket Toss” where a giant split walrus skin is held by a group of people in a circle while a jumper is propelled up to thirty feet into the air by the motion of the blanket holders pulling in unison on the hide. It is very likely that modern trampolines ultimately evolved from such a practice where hunting peoples had become creative in the ways by which animal skins could be adequately stretched. I have heard stories about indigenous people bouncing children on skins as well – a dual purpose tactic for both children’s play and tactful hide tanning. However, on this day we did not have a large group of people or small children available to assist us with our moose skin stretching task. Instead, we used a variety of hand tools. Traditionally Native American people used wooden poles, both sharp and blunt on the ends, to press into the skins and provide a variety of different stretching pressure (Figure 16). Eskimo people often used the edge of a dull ulu knife. We used two different spruce poles and also used a shovel and metal pipe. We employed a diversity of motions to work the skin. Sometimes we pushed, other times we pressed hard and scraped, and other times we used force to pound on the skin. The shovels and the metal pipe work excellent as a squeegee to push out the excess water. We often pressed hard in a downward motion and scraped the tools across the skin. Slowly the skin became drier, softer, and more and more pliable. After taking a few short breaks here and there and then continuing to diligently work the skin we reached a point where the skin was very close to dry, but not dry enough, and it seemed that no matter what we did it would not ever dry thoroughly in the time we had left to complete the job.
Some of the degree of effort required is related to the weather. If you are working outside and it is rainy, or inside and you do not have enough airflow, the process will become difficult. However, you also could have trouble if you are working outside when it is too hot, as then the hide could dry too fast. The day we tanned the moose skin was cloudy and a bit cool but also somewhat breezy. When the sun came out that day, we received our greatest skin drying help from Mother Nature. Nonetheless, we still could not complete the tan until we moved into the house and started a fire in the wood stove. Indoor tanning with the assistance of heat from a wood stove is a long practiced method of finishing a skin and it works brilliantly to help along the final stretching and drying process. We simply got the fire hot and pulled the hide back and forth across the heat for about an hour until it finally dried. When it did dry, it was as soft as could possibly be for a home-tanned moose skin! It was 2am and after we admired our work and the accomplishment of a perfectly brain-tanned Alaska moose skin, I curled up in it like a blanket and fell asleep on the floor next to the wood stove.
Just over five years after this moose met my arrow I had finally finished the job of tanning its skin using its own leg bone as a scraping tool and its own brain as the tanning agent. Although it took me five years, I stayed committed to the task and was able to accomplish it while maintaining a full-time job and dozens of other commitments because of the capability to complete each step in stages, as I have lain out in this article.
Smoking the skin after tanning
Two more steps remain before we can call the job done. After you have completed your tanning, if you want a material that is more durable for outdoor wear, you will need to thoroughly smoke your hide (if you pre-smoked your hide you will now be smoking it again). The reason why buckskin used in art, artifacts, jewelry, clothes etc. is usually tan in color is because it was smoked. Smoking the skin is said to waterproof it. As explained above, the smoke penetrates the fibers you have separated with the brain lipids and the stretching and essentially seals them open. After your skin is tanned and then smoked, if it gets rained on or even submerged it will then dry soft. Sometimes you will see white buckskin. For example, there are white colored Native American buckskin dresses in museums. It is said that buckskin was normally not smoked for ceremonial wear or for any special item that would not be exposed to the outdoors. So it is up to you to smoke your finished skin or not. The more thoroughly you smoke the skin the darker the color will be and the more the durable it will be. Different woods also create different colors. You will have to experiment. I smoked my moose skin inside of my fish smokehouse using rotten cottonwood stumps (see ‘pre-smoking’ above for more on this).
Patching and un-framing
Lastly, when the final stretching and drying is complete, there will usually still be a few holes in the skin. After you finish smoking the skin, sew each of the holes with either artificial sinew or real sinew. I always use real sinew, which you can also obtain from any harvested mammal. Also, when you pull your hide from the frame for the final time you do not want to un-lace it. Instead you want to cut it off just inside from the lacing holes. Not only are all of those holes undesirable, the edge of a skin is difficult to tan and usually ends up stiff, so cut the skin off of the frame with a knife (later, you can unlace the long edge portion of skin and use it to make rawhide rope and cord if you so desire).
Now it is up to you what you will make with your tanned skin! It is a whole lot of work, but I can attest that it is a very worthwhile experience.
Please write to james.vanlanen@alaska.gov if you have any questions about brain-tanning. A webpage version of this article includes about 15 more pictures.
[i] www.braintan.com sells the dry-scraping tool I use.
Subscribe to be notified about new issues
Receive a monthly notice about new issues and articles.