Fleshing Mink with Deer Bones
I've always argued in favor of making the most of what you harvest. One example I've used is the use of a deer leg bone to flesh raw mink pelts before putting them on the drying boards. Several trappers asked me to demonstrate the technique, so here it is — in black and white.
Three things are required:
- a particular bone from a deer's leg
- a fleshing beam of the right shape
- a freshly skinned mink pelt
A Particular Bone
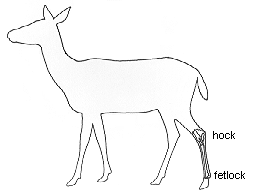
The next time you go deer hunting plan on saving the "cannon" bone — the bone between the hock and the fetlock (ankle) on the hind leg. It is best to take the bone from an older animal, preferably a buck, because the bones are more solid and fused together in mature deer than in a young animal like a fawn or yearling, which is still growing. Typically, hunters either cut the meat off the hind leg and leave the long bones attached to the rest of the skeleton in the field, or they saw off the lower leg below the hock to avoid getting any bad smell from the glands on the hind quarter when it is hung on the meat pole. If you want to save the bone, don't do either of those things.
 If you bone out the animal, just disjoint the lower leg at the hock, wrap it in a plastic bag, and slip
it into your pack with the meat. It will add very little weight to your load. If you drag the deer
out intact or pack it out in quarters, leave at least one hind leg in one piece; or leave both intact,
if you need to balance the load on a pack animal. If you hang your meat without the hide, skin the
leg all the way down to the hoof but leave the cannon bone attached until the hind quarter is ready
to cut and wrap. If you disjoint that lower leg bone, the achilles tendon will come loose and make it
difficult to hang the quarter, because you will have to tie a rope around that slippery leg bone instead
of looping it through the hole between the bone and the tendon. There is virtually no meat on the bone
you want to save.
If you bone out the animal, just disjoint the lower leg at the hock, wrap it in a plastic bag, and slip
it into your pack with the meat. It will add very little weight to your load. If you drag the deer
out intact or pack it out in quarters, leave at least one hind leg in one piece; or leave both intact,
if you need to balance the load on a pack animal. If you hang your meat without the hide, skin the
leg all the way down to the hoof but leave the cannon bone attached until the hind quarter is ready
to cut and wrap. If you disjoint that lower leg bone, the achilles tendon will come loose and make it
difficult to hang the quarter, because you will have to tie a rope around that slippery leg bone instead
of looping it through the hole between the bone and the tendon. There is virtually no meat on the bone
you want to save.
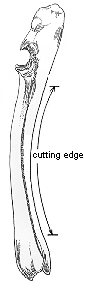
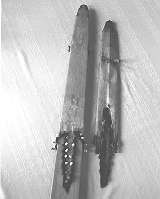
When you're ready to make your fleshing bone, just disjoint it as illustrated in the drawing and clean it up with a knife. A few minutes of simmering in water will help you clean off any remaining meat and it's ready to use. A word of caution — if you have a young deer or if you leave the bone simmering too long, you run the risk of separating the thin bone actually used for fleshing from the larger bone used as the handle. Therefore, don't leave it in the hot water very long. If necessary, you can sharpen the natural "knife edge" on the little narrow bone with a file before use, but generally I have not found this to be necessary.
The Fleshing Beam
 This fleshing tool will not work on a flat surface such as a stretching board. The surface of the
fleshing beam has to have a curvature similar to the natural curve in the side of the bone used for
fleshing. The curve on the beam and the bone do not have to match exactly but the closer they are,
the more surface contact you will have. When the curvatures are similiar, you can apply more pressure,
faster, over a broader area. The diameter of the beam at various points should be just large enough to
slide a cased mink pelt completely over and hold it without slippage. For example, a broom handle would
be too narrow while the average log for the fireplace is too big. The pelt has to slip all the way down
the beam to the mink's nose.
This fleshing tool will not work on a flat surface such as a stretching board. The surface of the
fleshing beam has to have a curvature similar to the natural curve in the side of the bone used for
fleshing. The curve on the beam and the bone do not have to match exactly but the closer they are,
the more surface contact you will have. When the curvatures are similiar, you can apply more pressure,
faster, over a broader area. The diameter of the beam at various points should be just large enough to
slide a cased mink pelt completely over and hold it without slippage. For example, a broom handle would
be too narrow while the average log for the fireplace is too big. The pelt has to slip all the way down
the beam to the mink's nose.
If you shoot a young deer and the cutting edge bone separates from the main leg bone, don't throw it away. You can use it as a slick little letter opener. If necessary, sharpen the edges with a file and degrease the bone by simmering it in a pan of water with a little dish soap. If the deer was special, write the hunt information on the handle of the opener with India ink and make it a gift for that special person.
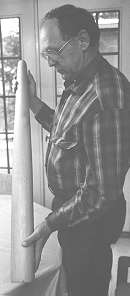
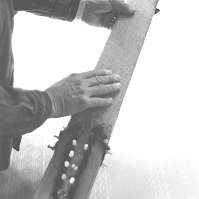
I make my fleshing beams from a piece of standard 4x4 stock obtained at the local lumber yard. Make sure the stock is clear (free of knots and defects) for at least 3 feet. The final length will probably be determined by how long a piece you can safely turn on a lathe. Stay away from very soft wood such as cedar, as it will chip while turning and will not finish smooth. Pine and fir are okay, or you can use something really hard (and expensive) like maple or oak, but it's not necessary. I've often thought about turning an "Executive Class" fleshing beam from black walnut just to finish those few really special high class pelts!
As you can see in the accompanying photograph, my fleshing beam has a nice smooth taper to it. When finished, this beam was 37 inches long, 3½ inches in diameter at the base, and 1½ inches in diameter at the top. Sand your beam nice and smooth on the lathe before removing it. Finish with several coats of exterior varnish or Varathane to harden the surface. A smooth durable finish also makes it easier to slip pelts on and off and simpler to clean with soap and water when you're done fleshing.
Fleshing The Pelt
Skin the mink by your favorite method, either through the mouth and peeling it down or slitting the hind legs across the anus and pulling the pelt up to the nose. Don't worry too much about the amount of material left on the hide. It's better to leave some material on and scrape it off later than try to skin close and run the risk of cutting the skin. All the meat and fat comes off about the same no matter if there's a little or a lot.
For additional information on preparing mink pelts as well as other furbearers, you may want to view ADF&G's recently completed video for trappers, Alaska Guide to Fur Handling. We sent a copy to each state chapter of the National Trappers Association for chapter use, and all school and public libraries in Alaska received a copy. We want trappers to get the most out of their hard-earned catch without being forced to spend a lot of money learning a new method. Therefore, we developed this video to help our trappers do a better job of skinning, fleshing, and presenting their pelts.
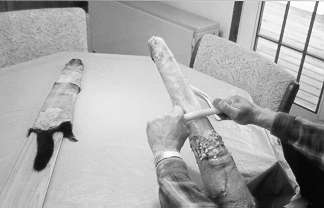
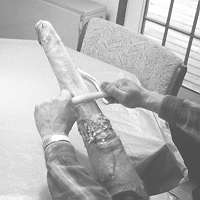
Before slipping the pelt on the beam, make sure the fur is damp (spray some water on if necessary) to prevent "singing," caused by pressure between the bone and the beam as you push the flesh and fat off. Once the pelt is on the beam, prop it up on a bench or table and sit down with the base of the beam centered in your lap. Hold the deer bone with one hand on each end and apply pressure downward and towards you just as you would pull a draw knife. Start at the top behind the ears and pull the tool a couple of inches at a time. Keep rotating the beam and pelt as you work down the skin.
Virtually all mink have to be fleshed before putting them on a drying board. In Alaska, we have to take off the back saddle because of a fat layer between this thin muscle and the skin. If you don't remove this layer of fat, the skin will rot and the hair will slip. However, mink in other parts of the country may not be as fat, and your buyer may want the saddle left on. Before you take it off, make sure you talk with the guy who is going to be writing out the fur check. Most of our mink in southeast Alaska are very fat — up to a quarter of an inch thick all the way around much of the body from the front legs back to the tail. Virtually all unwanted material can be removed in a few minutes once you get the hang of using this tool. It's surprising how easy the little tool cuts off fat, connective tissue, and muscle without damaging the skin. When you finish, a prime skin will be pure white. Once the skin is tacked on the drying board it probably will be necessary to touch up the pelt around the head area with a sharp pointed knife, but that's all you should use a knife for after the skinning is done.
The next time you harvest a nice buck deer from your favorite woods, save his leg. Then you can relive that hunting experience every time you pull that bone down another buck mink taken from your favorite marsh. Good hunting and good trapping!