A Guide to Building and Placing Birdhouses
Building Instructions
A wide variety of birdhouse plans are available. As long as you remember the 11 important points listed above and are careful to use the correct dimensions, any birdhouse plan will work. The following plans are suitable for Alaskan birds. Use the height, width, and entrance hole measurements in the Birdhouse Dimension Table to adapt these two plans for any species of cavity-nesting bird.
Split Log Construction
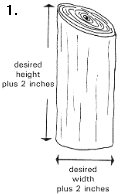 Use a section of birch, aspen, or spruce log from your firewood pile. Be sure to select a log large enough for the inside cavity dimentions required by the bird that will use the house. Cut the bottom of the log section off squarely and cut the top at a slight angle to allow a pitched roof.
 Saw the log in half vertically so that the pitched top is divided into an upper and lower section.
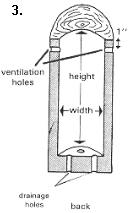 Hollow out the inside of the two halves to the required dimentions using a chisel or chainsaw. Leave the bottom of the log halves solid, but hollow out the top completely. Drill three, 1/8-inch drainage holes through the floor of the back half. Drill 1/8-inch ventilation holes through each side of the back half, 1-inch below the top.
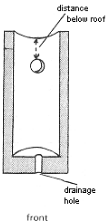 Drill an entrance hole through the front log section. Be sure to make the hole the correct size and at the proper height above the cavity floor. Drill one, 1/8-inch drainage hole through the floor of the front half.
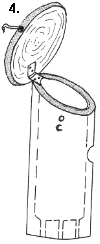 Rejoin the two halves using glue, wire, or latches. Try to seal the crack to reduce drafts through the cavity. Cut a roof for the house from a log section of board 2 inches larger in diameter than the joined sections. Hinge the roof to the top of the hollowed log with a brass or galvanized steel hinge, so that the roof extends over the edges at least 1 inch on all sides. Place latches on each side of the roof so that predators will not be able to pry off the roof.
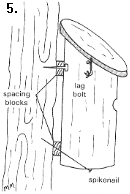 Attach your split log birdhouse to a post or tree using a lag bolt and spike nail. Spacing blocks will allow you to open the lid easily.
Dimension-Board Construction:
(Saw ¾-inch boards to the appropriate sizes and shapes)
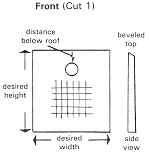
Cut the proper size entrance hole at the correct distance below the top. Roughen the board below the entrance, or attach ¼-inch mesh screen so that young birds will be able to climb out. Be sure to bevel the top so the roof will fit properly.
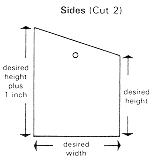
Cut the top edge of the side boards at an anle so the roof can be pitched. Drill 1/8-inch ventilation holes on each side about 1 inch from the top edge.
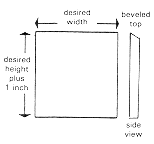
Back (Cut 1)
The backboard must be 1 inch taller than the front to allow a sloped roof. Be sure to bevel the top of the board so the roof will fit properly.
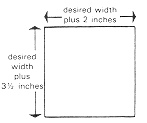
Roof (Cut 1)
Cut the roof large enough to overlap all four sides by 1 inch.
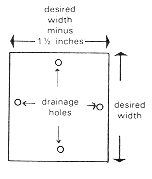
Bottom (Cut 1)
If you use ¾-inch boards, the bottom must be 1½ inches smaller than the width of the box. Larger or smaller boards will alter the size slightly. When the box is constructed, the bottom should be surrounded by the other boards to prevent water from seeping in. Drill 1/8-inch drainage holes about 1 inch from the edge on each side.
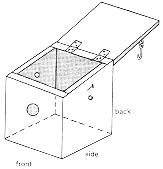
Nail the box together so that the bottom board is enclosed by the four sides. Hinge the roof on one side so that it extends beyond the edges of the four sides of the nest box. Place a latch on the roof so predators won't be able to pry the box open.
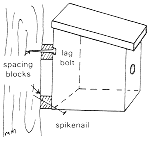
Attach the nest box to a post, tree, or house using a lag bolt and spike nail. The spacing blocks will allow you to open the box easily.
